场景简介
我们经常会有这样的运维场景,扩容一批机器需要配置SLS日志,对于已经配置好的SLS Logstore后,我们只需要将机器加到机器组里。
解决方案
传统的解决方案是登录每台ecs实例并安装logtail,执行的命令为
wget http://logtail-release-{ {ACS::RegionId}}.oss-{ {ACS::RegionId}}-internal.aliyuncs.com/linux64/logtail.sh -O logtail.sh; chmod 755 logtail.sh; ./logtail.sh install { {ACS::RegionId}};echo { { LogTailUserDefinedId }} > /etc/ilogtail/user_defined_id 分解下Task,需要以下几步:
1.检查实例是不是Running状态 2.调用云助手CreateCommand创建上述命令 3.调用InvokeCommand执行 4.等待执行成功 5.删除模板再转换成OOS模板并创建命名为installSlsAgent
{ "FormatVersion": "OOS-2019-06-01", "Description": "Install Logtail agent on the ECS Instance.", "Parameters": { "InstanceId": { "Type": "String", "Description": "the Instance Id to install ilogtail", "AllowedPattern": "i-[A-Za-z0-9]*", "MinLength": 1, "MaxLength": 30 }, "LogTailUserDefinedId": { "Type": "String", "Description": "the user defined Id write to /etc/ilogtail/user_defined_id", "AllowedPattern": "[A-Za-z0-9\\-_]*", "MinLength": 1, "MaxLength": 30 }, "OOSAssumeRole": { "Type": "String", "Description": "The RAM role to be assumed by OOS.", "Default": "OOSServiceRole" } }, "RamRole": "{ {OOSAssumeRole}}", "Tasks": [ { "Name": "checkInstanceReady", "Action": "ACS::CheckFor", "Description": "describe instances with specified parameters, refer them here: https://help.aliyun.com/document_detail/63440.html", "Properties": { "API": "DescribeInstances", "Service": "ECS", "PropertySelector": "Instances.Instance[].Status", "DesiredValues": [ "Running" ], "Parameters": { "InstanceIds": [ "{ { InstanceId }}" ] } }, "Outputs": { "InstanceIds": { "ValueSelector": "InstanceIdSets.InstanceIdSet[]", "Type": "List" } } }, { "Name": "createCommand", "Action": "ACS::ExecuteApi", "Description": "create the command to install logtail agent.", "Properties": { "API": "CreateCommand", "Service": "ECS", "Parameters": { "CommandContent": { "Fn::Base64Encode": "wget http://logtail-release-{ {ACS::RegionId}}.oss-{ {ACS::RegionId}}-internal.aliyuncs.com/linux64/logtail.sh -O logtail.sh; chmod 755 logtail.sh; ./logtail.sh install { {ACS::RegionId}}; echo { { LogTailUserDefinedId }} > /etc/ilogtail/user_defined_id" }, "Name": "oos-{ {ACS::TemplateName}}", "Type": "RunShellScript" } }, "Outputs": { "CommandId": { "Type": "String", "ValueSelector": "CommandId" } } }, { "Name": "invokeCommand", "Action": "ACS::ExecuteApi", "Description": "invoke the command to install ilogtail", "Properties": { "Service": "ECS", "API": "InvokeCommand", "Parameters": { "CommandId": "{ { createCommand.CommandId }}", "InstanceIds": [ "{ { InstanceId }}" ] } }, "Outputs": { "InvokeId": { "Type": "String", "ValueSelector": "InvokeId" } } }, { "Name": "untilInvocationDone", "Action": "ACS::WaitFor", "Description": "until invocation ready", "MaxAttempts": 5, "Properties": { "Service": "ECS", "API": "DescribeInvocations", "Parameters": { "InvokeId": "{ { invokeCommand.InvokeId }}" }, "DesiredValues": [ "Finished" ], "PropertySelector": "Invocations.Invocation[].InvokeStatus" } }, { "Name": "describeInvocationResult", "Action": "ACS::ExecuteApi", "Description": "get the command invocation result", "Properties": { "Service": "Ecs", "API": "DescribeInvocationResults", "Parameters": { "InvokeId": "{ { invokeCommand.InvokeId }}" } }, "Outputs": { "InvocationResult": { "Type": "String", "ValueSelector": "Invocation.InvocationResults.InvocationResult[].Output" }, "ExitCode": { "Type": "Number", "ValueSelector": "Invocation.InvocationResults.InvocationResult[].ExitCode" } } }, { "Name": "deleteCommand", "Action": "ACS::ExecuteAPI", "Description": "clean up the install ilogtail command", "Properties": { "Service": "ECS", "Risk": "Normal", "API": "DeleteCommand", "Parameters": { "CommandId": "{ { createCommand.CommandId }}" } } } ], "Outputs": { "InvocationResult": { "Type": "String", "Value": { "Fn::Base64Decode": "{ { describeInvocationResult.InvocationResult }}" } }, "ExitCode": { "Type": "String", "Value": "{ { describeInvocationResult.ExitCode }}" } }} 以上模板我们很好的解决了单台机器执行Install sls Agent的任务,那么对于多台机器的执行怎么办呢?OOS的Loop功能可以很好的解决这个问题。并且OOS支持模板嵌套执行,那么我们只需要构建一个传入实例ID列表的
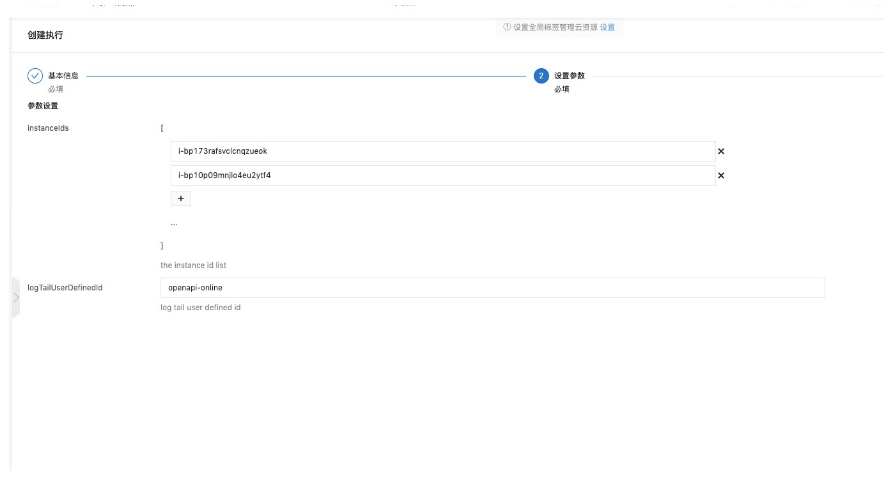
{ "FormatVersion": "OOS-2019-06-01", "Parameters": { "InstanceIds":{ "Type": "List", "Description": "the instance id list" }, "LogTailUserDefinedId": { "Type": "String", "Description": "log tail user defined id", "MinLength": 1, "MaxLength": 30 } }, "Tasks": [ { "Properties": { "TemplateName": "installSlsAgent", "Parameters": { "InstanceId": "{ { ACS::TaskLoopItem }}", "LogTailUserDefinedId": "{ { LogTailUserDefinedId }}" } }, "Name": "installSLSAgent", "Action": "ACS::Template", "Outputs": { "ExitCode": { "ValueSelector": "ExitCode", "Type": "Number" } }, "Loop": { "Items": "{ { InstanceIds }}", "MaxErrors": 100, "Concurrency": 10, "Outputs": {} } } ], "Outputs": {}} 创建一个执行
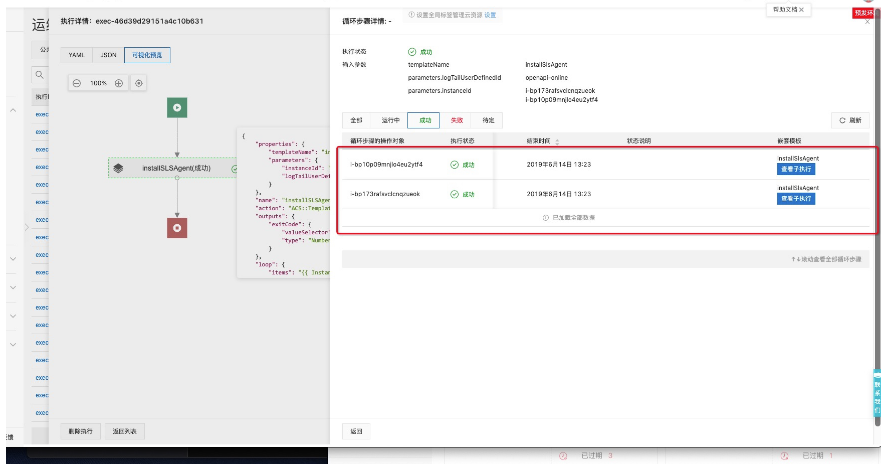
执行后看详细信息,发现执行已经成功并且可以看到每个loop子task的状态
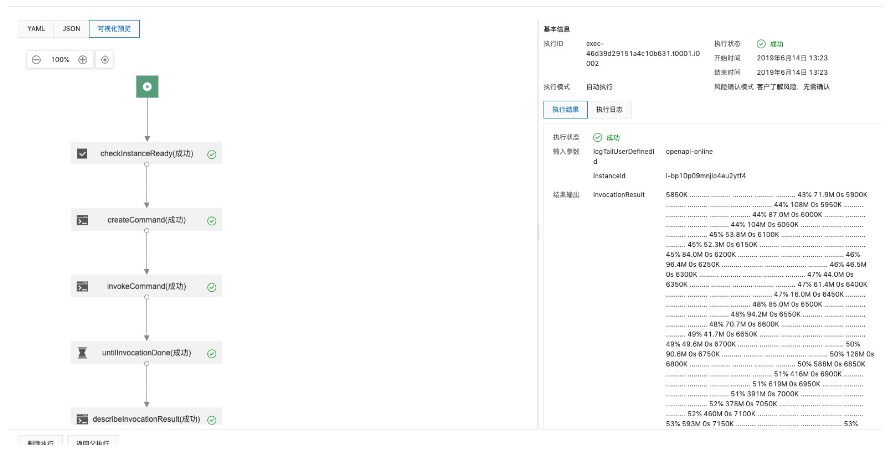
由于子task是一个嵌套执行,我们点击可以看到嵌套的模板执行情况
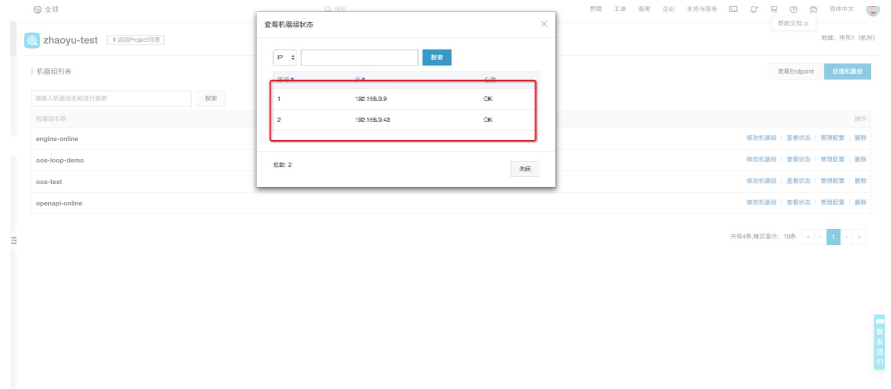
最后到机器组查看机器状态OK说明已经执行成功
总结
以上我们介绍了如何使用资源编排OOS批量安装SLS-Agent并加入到机器组中,更多场景待挖掘。目前运维编排(OOS)处于内测中,欢迎试用提意见
本文为云栖社区原创内容,未经允许不得转载。